How To Test and Calibrate a Thermal Sensor
In order to calibrate a thermal sensor with the Pithon package, it depends on how modified the original sensor is. If the original Monti sensor is used, the sensor can be calibrated with one simple measurement. If you’ve made modifications from the original, it’s characteristic curve must be found.
Calibrating Monti Provided Sensor
With Monti’s initial design, the characteristic curve from sensor to sensor is nearly identical. To save the user the time and challenge of taking the data points for a calibration curve, with Monti’s sensor only a baseline value must be input. To accomplish this, follow the steps below.
Step 1
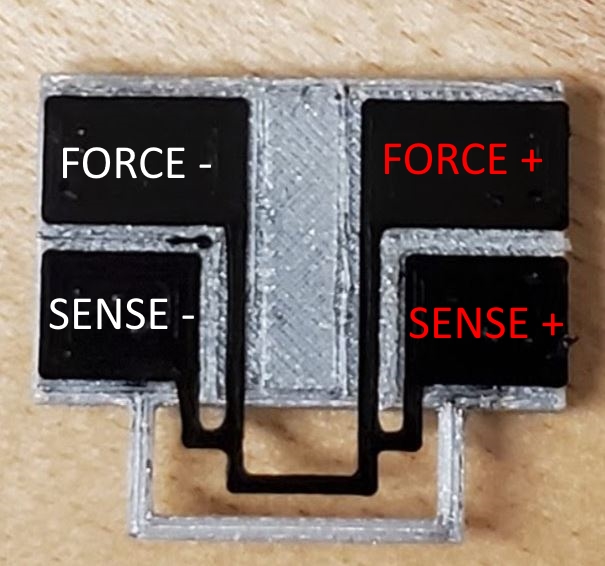
Connect your 4-point temperature sensor to the Arduino microcontroller as described in 4-Terminal Sensing For Real Time Data Logging. If you are using a source/measurement unit (SMU) rather than an Arduino, apply force and sense connections as shown.
Step 2 Open the Monti signal processing and calibration software.
Step 3 Gather a temperature measuring device (thermometer or others). Take note of the current temperature and input that into the software when prompted.
Step 4 With the Monti software, the software will automatically calculate the calibration curve at this point. If using an external device, take note of the resistance given by the device. Enter this value into the Arduino program when ready.
At this point, the original Monti thermal sensor is calibrated and ready for use.
Calibrating Custom Thermal Sensor
When creating a brand new thermal sensor design, the sensor’s distinct calibration curve. In order to do this, an oven or environmental chamber will be required to calibrate the best curve.
Step 1 Follow the same step as you would when calibrating the original Monti sensor. With a 2-pont sensor, follow the setup described at 2-Terminal Sensing for Real-Time Data Logging Using a Microcontroller.
Step 2 Place the sensor in the oven or environmental chamber. At this point, make sure that there is some way to monitor temperatuer in the chamber.
Step 3 Begin logging data and increase the temperature of the chamber.

Caution: Your heating chamber can become very hot. Exercise caution when dealing with hot devices.
If your heating chamber does not log temperature over time, make sure to make note of the temperature at every minute with the help of a timing device. If your measurement device doesn’t log resistance over time, also take note of the resistances every minute. Continue the test until the temperature stabilizes at 50 degrees Celsius.

NOTICE: Increasing the temperature higher than 50 degrees Celsius may cause permanent damage to the sensor
Step 4 Export both data and correspond temperature and resistances with respect to time. Input these values into the software. If you measured temperature by hand, only enter values in at every 60 second mark. If you measured resistance by hand, do the same for that. The software will then create the calibration curve.
At this point, the custom sensor you have designed has been calibrated and is ready for use.